
$21.71 each
Available
Please note Whilst all care has been taken to provide you with a good indication of colour, you should always sight product samples before use, due to natural variations in Colours & Sizes. Products may vary from image provided.
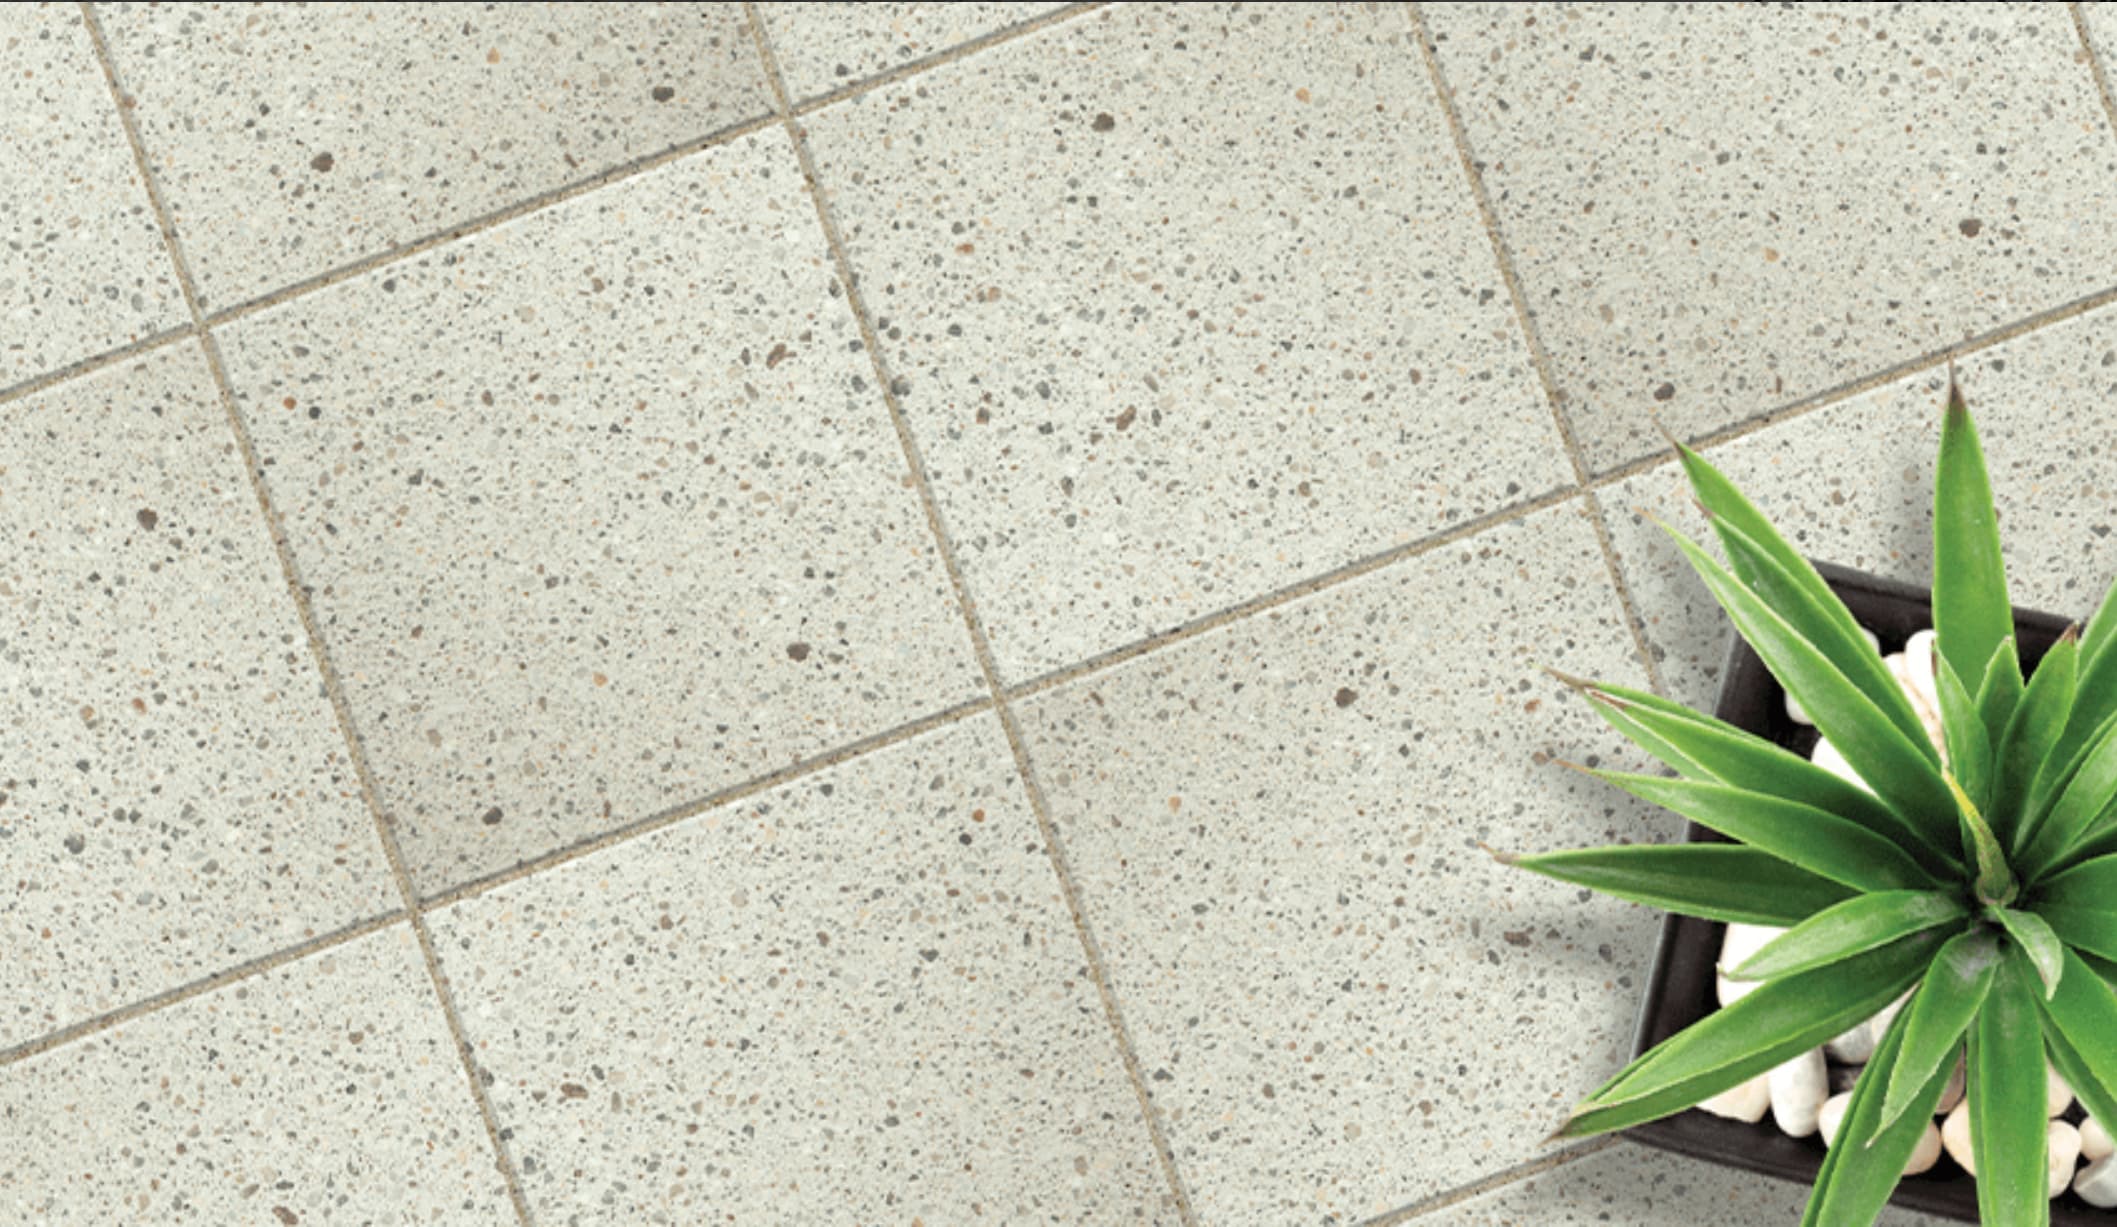
The Euro® Honed 4×4 premium paver features a near polished, honed surface texture which increases aesthetic appeal by exposing the natural aggregates within the paver.
The highly detailed finish includes a light shot blast which lightly textures the surface which achieves a P5 Slip Rating.
Easy to install, it will add the professional, designer touch to your pool surrounds or alfresco area.
| Weight | 14.50 kg |
|---|---|
| Dimensions | 400 × 400 × 40 mm |
| Free Delivery | 3 Tonne and Over (Conditions Apply) |
| Supplier | |
| Price per m2 | $135.69 |
| Qty per m2 | |
| Qty per pallet | |
| Application | Patios, Courtyards, Steppers, Pool Surrounds, Entertaining Areas, Pathways |
Installation Procedures – PAVERS
Mark out the area to be paved. Dig out the existing lawn and loose earth to a depth of around 150mm below the required finished height of your pavers. Remove all plant matter including roots, as any vegetation you leave in the ground will break down and cause your paving to sink in the near future. Scrape the bottom of your work area flat with your shovel.
Handy Tips: Dig and shovel straight into your wheelbarrow. No point double handling.
Tip in your foundation material(s) to the minimum required depth as indicated below. A flexible installation is suited to light traffic and a rigid installation is better suited to driveway or heavy traffic. Fire up your Wacker Packer and compact 2 or 3 times until you have a nice firm surface. If you’re foundation is concrete, make sure it is at least 20 MPa in strength and is screeded to a smooth and level pad.
Handy Tips: Use ear muffs when you use a Wacker Packer.
3. Add Your Bedding Type
The most common bedding type used for paving is washed coarse sand. A minimum 25mm layer on top of your foundation should do the trick. Tip in the sand and rake it around until you have an even level distribution of sand. If you are using concrete, you have the option of bedding your pavers in sand, mortar or a suitable propriety adhesive.
Handy Tips: Please refer to manufacturer’s instructions for the correct use of mortar or adhesives as an alternate bedding type.
Working from the far end, screen your sand smooth with a long straight float. Timber edge rails at half a paver depth below the existing ground level might help here. Use a spirit level to make sure your compacted sand slopes away from your house and towards your lawn or garden for rainwater runoff.
Handy Tips: You can’t be too smooth. Make sure yours and bed is nice and flat before you lay any pavers.
Set up a string line and carefully place your first row of pavers in position. Make sure your line is dead straight. Space your pavers a few millimetres apart using the blade of a trowel to get a consistent gap. If you are using mortar or an adhesive as a bed, you can butt your pavers together to achieve that contemporary look you have always wanted. However, if you are going for this option then expansion joints are required. Expansion joints need to be provided at intervals of no more than 4 meters and must mirror all concrete base control joints.
Handy Tips: Keep close to the ground (not arched over) when laying pavers to protect your back.
If you’re paving out into an area bounded by grass (or a movable garden bed edge) you might get away without needing to cut any pavers. But if you want to in-lay a pattern, do a curved edge or fit your paving snugly around things like down pipes, it’s time you went to your local hire place and get yourself an electric brick saw. While you’re there, ask them about the correct procedures for cutting concrete pavers.
Handy Tips: Choosing the right sized paver for certain jobs can eliminate the need to hire a brick saw.
With the first line of pavers laid, it’s time to head off in a different direction. Grab a big right-angle square to set a course at exactly 90 degrees to the first row and off you go. As you work forward, use a rubber mallet to tap your pavers down for a nice flush surface.
Handy Tips: Don’t walk on your screeded bed of sand.
Unless your pavers are being laid up against a wall they should be secured at every edge with pre-mixed concrete (add water only) or a mixture of coarse sand and cement at a 4:1 ratio. The finished edge of your paved area should be raised a little bit above any surrounding lawn.
Handy Tips: For a neat job, trowel the excess concrete up against the paver at a 45-degree angle.
This is the easy bit. With all your pavers now in position, it’s time to tip a load of fine sand (joint filling sand) on top and sweep it into all the little crevices. Note: All expansion joints shall be filled with an appropriate flexible material.
Handy Tips: For ease of filling the joints, the joint filling sand and pavement surface should be dry.
Drag the Whacker plate (see handy tip below) onto the paved areas and begin compacting the pavers. Once or twice will do the job. If you have returned the compactor to the hire yard, don’t panic, a piece of solid timber used in conjunction with a rubber mallet will do the job. Note: this is ONLY to be done if your bedding type is sand.
Handy Tips: An old piece of carpet under the compacting plate will avoid chipping any pavers.
It is not compulsory to seal your pavers; however, doing so will assist in reducing the chances of permanent staining and water penetration. It will also improve the aesthetic appeal of the finished pavement. Speak to your distributor for an appropriate sealer for your project.
CHECKLIST –
Pavers can usually be laid around your house without council approval. However, if you’re doing a driveway or working in an area where water run-off is an issue, you may need to contact your local authority. Some of the newer residential communities have covenants covering the use of driveway materials. If so, get authorisation before proceeding.
To lay courtyard/pathway pavers, you will also need:
To lay a driveway, you may also need:
Paver Size (L x W) Number of Pavers Required Per m2
600 x 600mm – 2.8
500 x 500mm – 4.0
400 x 400mm – 6.25
390 x 190mm – 13.5
387 x 290mm – 8.9
300 x 300mm – 11.1
250 x 500mm – 8.0
200 x 400mm – 12.5
200 x 100mm – 50.0
200 x 200mm – 25
$100.90 per m3
$163.90 per m3
