$4,450.00 each
Available
Please note Whilst all care has been taken to provide you with a good indication of colour, you should always sight product samples before use, due to natural variations in Colours & Sizes. Products may vary from image provided.
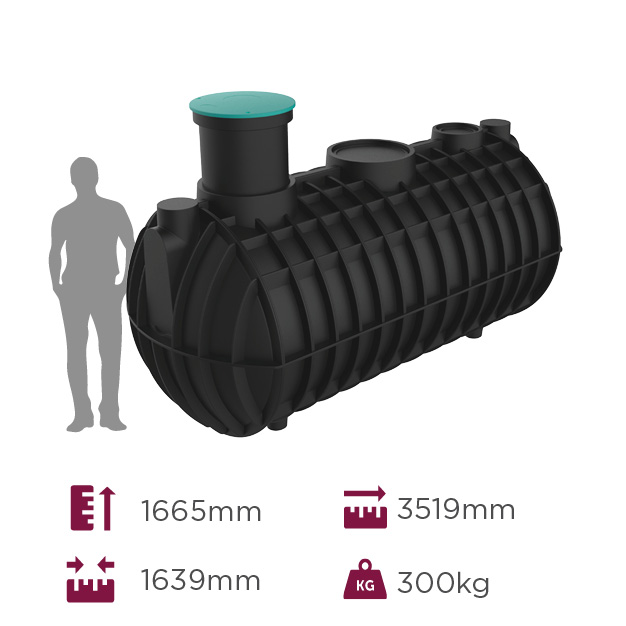
Tank design and manufacturing processes are critical to the structural integrity and life your tank.
All water tanks are certified to the Australian tank standard 4476 (License number SMKP21506) which guarantees your tank will last in the toughest conditions.
All water tanks are designed with a base radius of greater than 38mm to ensure an even radius thickness and greater strength. Every water tank design has also undergone a finite element analysis and been approved by independent audits.
Your water tank warranty = your peace of mind
A full written ‘Quality test report’ is provided on delivery with all results of the testing. Our proven, world-class systems allow us to offer a full 10 year “water tight” warranty, so you feel great about your new water tank.
Rural water tanks are supplied with the following: Inlet strainer/s, 90mm overflow outlet with mozzie mesh, Brass outlet, 32mm watermarked ball value.
Domestic water tanks are supplied with the following: Inlet strainer/s, 90mm overflow outlet with mozzie mesh, Brass outlet, 25mm watermarked ball value and 25mm bucket tap.
| Free Delivery | Free Delivery |
|---|---|
| Supplier |
A: Choosing where to locate your Tank
Consider these factors when choosing where to locate your Tank:
1. Near downpipe/s
• The easiest way to collect water into your tank is by locating it near your home’s downpipe/s. The closer the tank is to the supplying downpipe/s, the shorter the length
of PVC pipe you need to carry the water.
2. Ensuring clearance
• Ensure that where you plan to locate your tank, the tank’s top will be lower than the
bottom of the downpipe/s which will feed into it.
3. Flat base
• Your tank needs a solid, flat base to sit on. You may be able to use an area near the
downpipe/s which is already concreted or paved, such as a pathway.
· • The base for your tank needs to be wider than the tank itself to support the weight of
the tank when full.
· • If no existing base is available, you can easily create a concrete, paved, or compacted gravel base or buy or build a stand. (See ‘B. Preparing a base for your Tank’ for more information.)
4. Overflow
• Consider where you will direct the overflow from your tank. If you plan to connect it to
the underground stormwater supply, locate the pipe and plan how you will connect the
overflow to it. (See ‘E. Managing overflow from your Tank’ for more information.)
5. Connecting two or more tanks
• If you will have two or more tanks, they can be connected at the base by a flexible hose
or pipe, and at the top via the overflow so they will increase and decrease in level equally.
• If connecting tanks, it’s recommended to have the tanks level with each other to get
maximum water storage.
B: Preparing a base for your Tank
If you need to prepare a base for your Tank, it’s best to do it before your tank is delivered.
You can easily construct a base of your tank out of concrete, pavers, or compacted gravel, crusher dust or packing sand. You could also buy or build a tank stand.
Concrete base:
• An ideal thickness of a concrete base is 10cm.
• When boxing up your base, make sure the base is up to 100mm wider than the tank.
• Use reinforcing mesh placed in the concrete to provide extra strength.
• The base will need approximately seven days to fully harden before placing a tank on it.
Crusher dust base:
• Please note – this isn’t preferable if the land the base will be on is not naturally flat.
• A compacted base should be about 30cm wider than the tank.
• Consider excavating the site of the base so when the material is laid down, it is the same height as the surrounding ground level.
• To make the base more stable and keep the materials in place, first lay down a boundary of pavers or wood (pine sleepers) – you could also use the edge of a concrete pathway as part of the boundary if available.
• Compact the materials to enhance their stability.
ADVICE
• Keep in mind the height of the tank – if you don’t have enough clearance under the downpipe/s
or eaves, you may need to construct your slab further away.
• If positioning the base against a wall of your house, include a very small slope away from the wall in the base so rainwater that falls on it will naturally flow away and not pool against the house.
• Check that no tree roots or other sharp objects are in the area which could break through the
bottom of the tank.
• The water inside your tank weighs approximately 1kg per litre – your tank’s base must be able to
support the weight of your tank when full.
C: Positioning your Tank
If you know where you want to locate your tank, and your base is ready, the driver who delivers your tank will assist you to position it in place. If not, all you need to do is:
• Locate your tank’s overflow – a hole cut in a vertical part of the tank’s roof with a strainer fixed to it. Position the tank so the overflow is in the easiest location for how you plan to use it.
• Locate the outlets on your tank – position the tank so the outlets are easy to reach. When your Tank is positioned where you want it, add approximately 2.5cm (1”) of water to it to secure it in place
D: Connecting your downpipe/s to your Tank
When your tank is full, water is directed through the overflow to release the extra water and pressure from the tank.
Fitting your overflow
There are a number of overflow positions on each Tank.
1. After selecting the appropriate position on your tank you will need to drill a 90mm hole to accept the overflow kit provided.
2. To fit the kit into your tank, insert the elbow section of the kit into the 90mm hole.
3. Rotate the kit so the mouth of the elbow is facing upwards.
4. Push the kit all the way in until the rubber washer is snug against the outside of the tank surface.
5. Attach with the screws provided.
E: Managing overflow from your Tank
There are a few options for managing the overflow from your tank:
• Fall from the overflow outlet onto the ground near the tank. You could place a few rocks where the water lands to reduce the strength of its flow. With this approach, you should ensure that the pressure and volume of water from the overflow will not affect the stability of your tank’s base. Attaching a piece of pipe or flexible hose to the overflow outlet,
to direct the water away from the tanks base is recommended. Check with your local council if this overflow system is suitable.
· • Direct it back into your stormwater system. This could be by connecting the overflow back to the downpipe you have connected your tank to, or connecting the overflow directly into the underground stormwater pipes on your property. You can locate the stormwater pipes by starting at the bottom of a downpipe and digging carefully from there.
· • Direct it into another water tank or pool through piping.
Piping your overflow to stormwater, another tank or pool
· • Plan for and prepare your piping using the same guidelines in ‘D. Connecting downpipe/s to your Tank’.
· • Make a snug fitting of the piping to the overflow by using 90mm PVC pipe sections –no gluing is necessary.
· • Provide support to the piping, such as running it down the wall of your tank instead of extending it out horizontally from your tank then downwards. This helps to reduce strain on the fittings and the tank.
· • If your piping will run a long distance from the tank, consider using a piece of flexible pipe at the connection which will absorb movement in the piping.
· • Connect two or more tanks at the base by a flexible hose or pipe, and at the top via the overflow so they will increase and decrease in level equally.

$1,250.00 each

$1,850.00 each
$1,775.00 each
$365.00 each
